 How-To Install UFTP for Testing
 Overview
This guide explains how to set up a complete UFTP test environment consisting of a UFTPD server, an Auth server, and a UFTP client using the provided test certificates. All components can be installed on a single machine, making the setup suitable for evaluation and functional testing.
Warning
This setup is intended for testing only. The included certificates are not suitable for production use. Production deployments must use certificates issued by a trusted Certificate Authority (CA).
 Prerequisites
Java 17 or later (OpenJDK recommended)
Python 3.9 or later
The UFTPD server listening port must be reachable through your firewall. If stateful firewall inspection is enabled, configure the port for FTP connection tracking. Alternatively, configure and open a fixed range of data ports.
The UFTPD command port must be accessible from the Auth server.
For encrypted data transfers, the Python Crypto module is required. It can be installed using:
python3 -m pip install pycryptodome
 Installation and Configuration
To set up a complete test environment, install the following components:
Install and run a UFTPD server as described in UFTPD Server Installation.
Install and run an Auth server as described in Auth Server Installation.
Install the UFTP client as described in UFTP Client Installation.
All components can be installed on the same machine for testing purposes.
Authentication and File Transfer Flow
In this setup, the UFTP client authenticates using only a username and password. No client certificate is required.
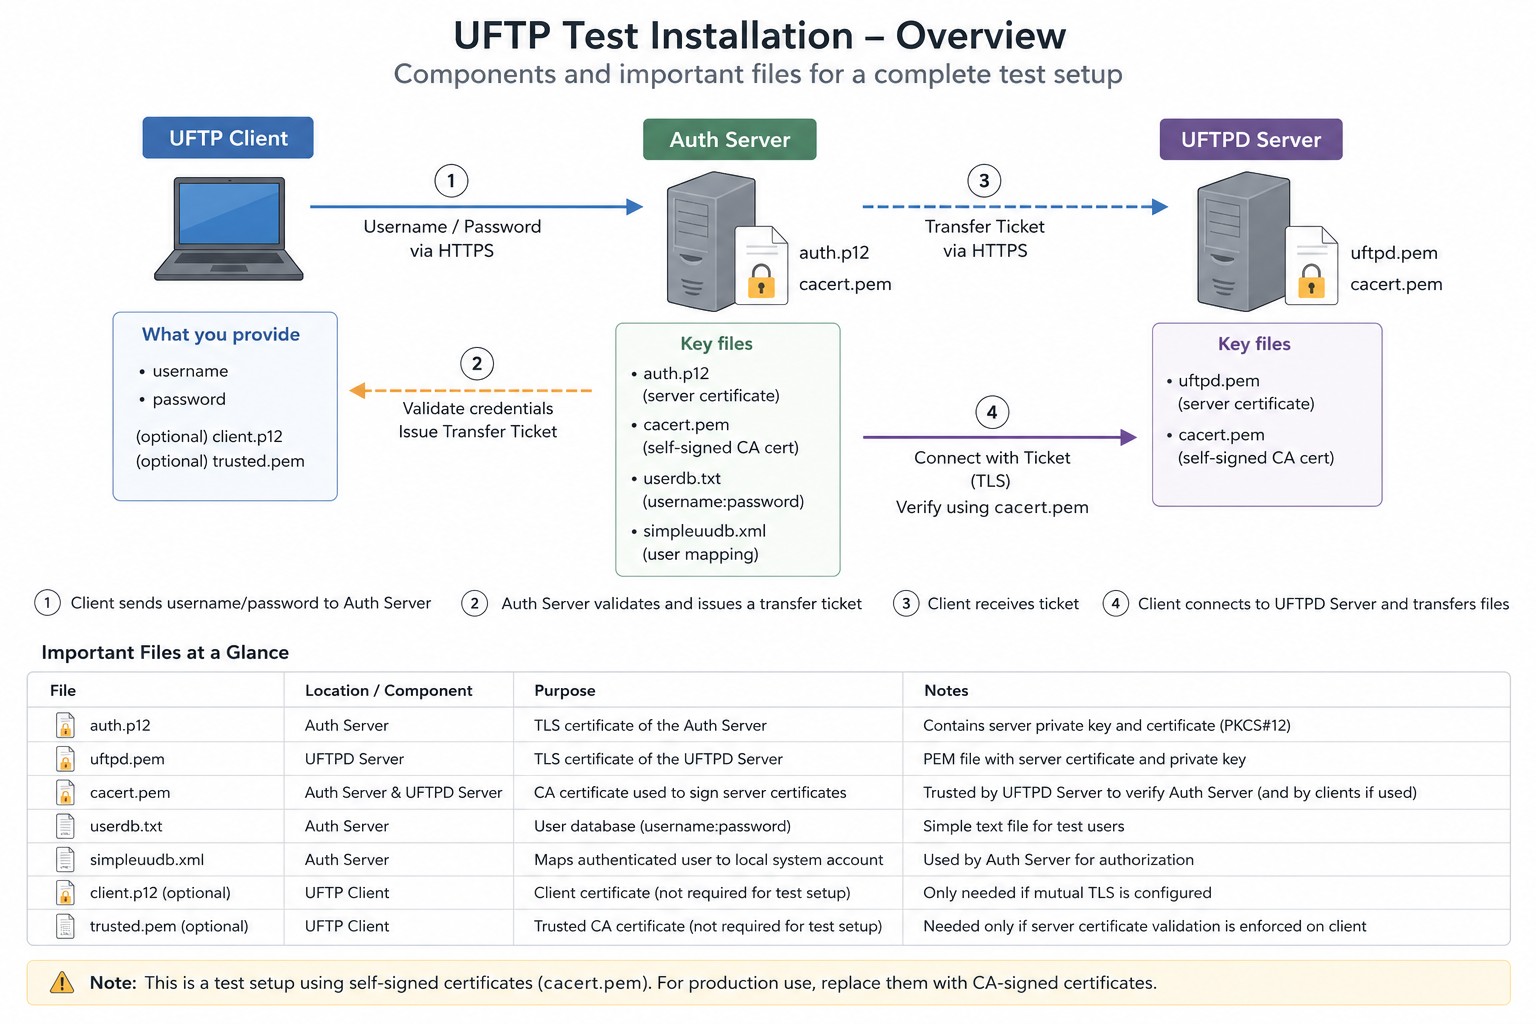
The authentication and file transfer process works as follows:
The client sends an authentication request containing its username and password to the Auth server. The Auth server validates the credentials using
user-authfile.txtand maps the authenticated user to a local account usinguser-mapfile.json.If authentication is successful, the Auth server sends a request to the UFTPD command port. This request configures the upcoming file transfer and includes the following information:
a generated one-time password
the local user ID and group ID
the client’s IP address
The UFTPD server stores this information and accepts an incoming client connection only if the supplied one-time password matches the expected value. The Auth server then replies with
OKand returns the generated one-time password to the client.The UFTP client connects to the UFTPD server using the standard FTP protocol. It authenticates with the one-time password received from the Auth server. Once authentication succeeds, the client can open data connections, list files, transfer data, and perform other FTP operations.
Testing the Installation
To verify that the installation was successful, run the functional and performance tests described in Testing the UFTPD Server.
These tests use the UFTP client to connect to the Auth server and the UFTPD server and verify authentication, file transfers, and performance.
Troubleshooting
Authentication failures
Check:
username/password
conf/user-authfile.txtundconf/user-mapfileAuth Server logs
ACL errors
Check:
certificate DNs in
conf/uftpd.acl
Certificate trust problems
Verify:
conf/cacert.pemcertificate validity
certificate subjects
matching CA certificates
Permission denied errors
Verify:
conf/uftpd.confdirectory permissions
configured
USER_NAMEUnix user exists